Monday, October 31, 2011

Devil's Food Cake

devilsfoodcake.jpg

Devil's food cake, probably the most "wicked" name given to a cake.

Why such a wicked name?

Well it's the exact counterpart of the white, light, and airy angel food cake.

This dark, dense and sinfully chocolate cake is the perfect dessert for any chocolat lover and the perfect cake for Halloween.

devilsfoodcake2.jpg

Enjoy!

Devils Food Cake
Makes one 9-inch cake

Cake:
  • 1 1/2 cups of cake flour
  • 1/2 cup of unsweetened cocoa powder
  • 1 tsp of baking soda
  • 1/4 tsp of baking powder
  • 1/2 tsp of salt
  • 1/2 cup of unsalted butter at room temperature
  • 1 1/2 cup of sugar
  • 2 large eggs at room temperature
  • 1 tsp of vanilla extract
  • 1 cup of buttermilk at room temperature
Frosting:
  • 3 cups of semi-sweet chocolate chips
  • 4 cups of whipping cream
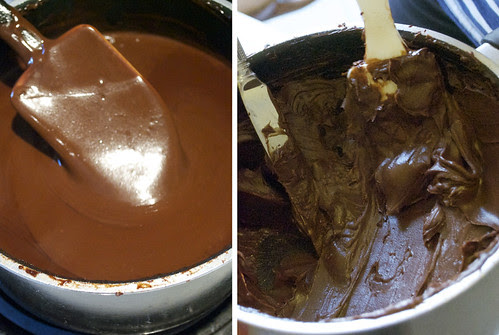
  1. To make the frosting, place chocolate chips and heavy cream into a saucepan. Cook over low heat stirring constantly with a rubber spatula, until combined and thickened, 45-60 minutes. Remove from heat and let cool.
  2. Once cooled transfer frosting to a large bowl and chill in the fridge for at least 1 hour or until thick enough to spread. Stir the frosting one more time before you chill to keep the consistency.
  3. devilsfoodcake4.jpg

  4. While your frosting is chilling in the fridge, heat oven to 350 degrees F. Butter two 9-inch round cake pans. Set aside.
  5. Sift together flour, cocoa powder, baking soda, baking powder and salt.
  6. In a large bowl beat the butter and sugar until smooth and creamy, about 5 minutes.
  7. Add 1 egg at a time and beat until well incorporated. Beat in vanilla. Add half the flour mixture to the bowl and stir together with a large spoon; stir in milk, stir in second half of the flour. Stir until all is well combined but do not overstir.
  8. Divide the batter evenly between the 2 pans and bake for 20-25 minutes or until a toothpick inserted in the middle of the cake comes out clean.
  9. Leave cakes in pan for 10 minutes before removing onto a cooling rack. Let cool completely before frosting the cake.
  10. To frost the cake, place 1 layer of the cake onto a platter, level the top of the cake with a serrated knife so the second layer can lay flat.devilsfoodcake5.jpg
  11. Cover the top of the cake completely and generously with frosting. Place the second layer on top and continue frosting the entire cake with as much frosting as desired. Best served the day of.
Cake Recipe adapted from Food and Drink Magazine
Frosting adapted from Martha Stewart

devilsfoodcake3.jpg

Monday, October 24, 2011

Apple Pie

applepie2.jpg

This weekend I attended Food Network's Delicious Food Show, where I was hoping to spot celebrity chefs and test out some tasty new foods.

afoodshow.jpg

afood1.jpg

afood3.jpg

afood6.jpg

I had just missed Padma Lakshmi, the host of Food Network's Top Chef, however, I did have the chance to sample quite a bit of food. Before I even got to the food show I was hoping someone would be serving oysters. I've never had them before, so I was pretty excited when I found a stand at the show. John Petcoff, who was running the Oyster Boy exhibit said I was his favourite "first timer", which I took as a great compliment. I think he was more entertained by how awkward yet excited I was about eating the oyster.

afood7.jpg

afood5.jpg

afood8

afood9.jpg

Another great "first time" food I tried was a fruit cake that I actually liked. I'm not a huge fan of fruit cake and I'm not sure if anyone is. But after trying Grandma Deb's Rum soaked Fruit Cakes I immediately thought, this is the kind of fruit cake that needs to go around during the holidays, not that gummy crap at the grocery stores, this is the fruit cake that is fit for the Queen. And after sending 2 1/2 pounds of her fruit cake to Prince William and Kate Middleton to mark the celebration of their wedding she received a thank you letter in the mail from St James Palace, confirming that her cake truly was fit for Royalty.

afood11.jpg

afood4.jpg

afood2.jpg

Now you're probably wondering how this food show is connected to my apple pie. Well, Whole Foods was also exhibiting at the show and they were giving away free organic apples. And just like any normal person, I probably should have taken one apple. But I wanted to make an apple pie. So I asked the Whole Foods guy if I could take enough apples to make a pie and to my delight he said yes. I only asked for four but he insisted I needed six, I wasn't about to argue with the Whole Foods guy.

afood10.jpg

So here is my scrumptious apple pie made with hand-picked apples from the Delicious Food Show.
P.S. If you don't let your pie sit for at least 3 hours, you'll get the runny filling in the photo below. There was no way my pie was going to sit safely for 3 hours without being eaten by one of my roommates, so for picture purposes, I had to cut into it sooner than I preferred.

applepie.jpg

Apple Pie
  • 2 9-inch pie crusts (follow steps 1-7)
  • 6 McIntosh apples, peeled, cored, and cut into thin slices
  • 1 tbsp of lemon juice
  • 3/4 cup of granulated sugar
  • 1 tbsp of brown sugar
  • 1/4 tsp of salt
  • 1 tsp of cinnamon
  • 1/4 tsp of nutmeg
  • 1/4 tsp of all spice
  • egg wash (1 yolk beaten with a tsp of water for brushing)
  • turbinado sugar (raw sugar) for sprinkling on top
  1. In a large bowl mix together apples, lemon juice, granulated sugar, brown sugar, salt, cinnamon, nutmeg and all spice. Set aside.applepie3
  2. On a floured counter, roll out one of the pie disc into a 11 inch circle. Transfer the dough to a 9-inch pie plate by rolling the dough over a rolling pin and rolling it out onto the pie plate. Fill the pie plate with the apple filling and dot with butter. Set in the fridge while you roll out the next dough.
  3. Roll out the second pie disc into a 11-inch circle. To make a lattice crust follow these steps, for a normal crust you need to cut several slits for steam vents across the top. Using the same method, roll the pie crust over a rolling pin and unroll onto the pie plate over the filling. Seal by crimping edges. Cover the pie and chill in the fridge for 30 minutes. Preheat the oven at 375 degrees F.
  4. Once chilled brush the pie with the egg wash and sprinkle with turbinado sugar if desired, transfer the pie onto a baking sheet (in case any filling spills over) and bake at 375 for 15 minutes, then reduce to 350 degrees for another 40-45 minutes, or until the pie is golden brown and the juices bubbling.applepie4
  5. Transfer pie to wire rack and let cool for 3 hours before serving.
Filling Recipe adapted from Smitten Kitchen


Sunday, October 16, 2011

Apple Cheddar Muffins


You know when you're hungry and you get a muffin at the coffee shop, because you're looking for something sweet like a cookie but more "umpf" than a donut and when you eat the muffin you find yourself deeply unfulfilled because that muffin was sweeter than expected or it just had no substance to it at all?

I totally get it.

And I have the solution. An apple cheddar muffin.

This is the muffin that is going to satisfy that sweet and savoury craving your having. It's gonna satisfy that "I wanna meal but don't actually need a meal" craving. Unfortunately they are kind of addictive, so you may end up eating a meal of muffins. But let's solve one problem at a time fellas!

Enjoy!

Apple Cheddar Muffins
Makes 12 muffins
  • 2 cups of flour
  • 1 1/2 tsp of baking powder
  • 1/2 tsp of baking soda
  • 1 tsp of salt
  • 1 cup of grated cheese (reserve 1/4 cup for topping muffins)
  • 1/2 cup butter at room temperature
  • 2/3 cup of sugar
  • 2 large eggs
  • 3 apples, peeled, cored and grated
  • turbinado sugar (for on top of the muffins)
DSC_0073.jpg
  1. Preheat the oven to 350 degrees F. Grease or line muffins pans with paper liners.
  2. In a bowl whisk together flour, baking powder, baking soda and salt. Mix in 3/4 cup of grated cheese. Set aside
  3. In a large bowl cream butter and sugar together. Once mixed add eggs, one at at time. Mix in grated apples.
  4. Combine the flour mixture into the large bowl and mix until just combined.
  5. Divide batter among muffin cups, you may have left over batter, this is when you take the opportunity to eat the extra batter... or make one big muffin!
  6. Sprinkle the rest of the cheddar cheese (1/4 cup) over the muffin tops and generously sprinkle turbinado sugar over each muffin.
  7. Bake for 20-25 minutes ( I did 22 minutes in my oven) or when a toothpick inserted into the center of the muffin comes out clean. Let cool in pan for 10 minutes then transfer muffins to cooling rack.

Monday, October 10, 2011

Pumpkin Cupcakes with Brown Sugar Icing

pumkincupcake.jpg

I love fall. It's such a beautiful season.

faall

I also love Thanksgiving. And although I didn't get a chance to see my family in Winnipeg, I was able to see my Ontario family in Guelph.

Well technically they are my roommate's family, but I feel they have adopted me as one of their own. Guelph is such a wonderful place to visit and it's only a short bus ride from Toronto, making it a great getaway from the city life.

And as much as Toronto is a part of Canada, I really feel like it's the smaller cities that make up Canada. It's the smaller cities and towns that inspire those Molson Canadian commercials where people are drinking beer on the deck in their spacious backyards, chillin' in their cottage chairs, and every now and then, checking the score of the hockey game.


Sometimes I forget how much I love Canada. It's good to be reminded every now and then.

As for the food this weekend.... well, there was food. A 30 pound turkey, that needed to be carved by three people, stuffing galore, potatoes, cranberry sauce, wine and oh yah... the desserts. Never underestimate the power of a potluck dinner.

DSC_0041

30lb turkey... dessert...

DSC_0084

Like mother, like son...

thanks

I decided to bring pumpkin cupcakes, and I must say, these flavourful and moist cupcakes will make you think second about baking that pumpkin pie. And of course you can't forget the sweet brown sugar cream cheese icing that top off the cupcakes.

Enjoy!

Pumpkin Cupcakes with Brown Sugar Icing
Makes 12 cupcakes
  • 1 3/4 cup of cake flour or all purpose flour
  • 1 1/2 tsp of Chinese five-spice powder (pumpkin spice also works well)
  • 1 tsp of baking soda
  • 1/2 tsp of salt
  • 1/2 cup of unsalted butter at room temperature
  • 1 cup of sugar
  • 2 eggs
  • 1 cup of unsweetened pure pumpkin
  • 1/2 cup of milk
Frosting
  • 1/4 cup of cream cheese
  • 1/4 cup of unsalted butter at room temperature
  • 1/2 cup of brown sugar
  • 1 cup of icing sugar
  • 1 tbsp of dark rum or vanilla
  • pumpkin seeds for garnish (optional)
  1. Preheat oven to 350 degrees F.
  2. Line 12 muffin cups with cupcake liners. In a small bowl, whisk flour, Chinese five-spice, baking soda and salt.
  3. In a large bowl, beat butter with sugar until very creamy. Beat in eggs 1 at a time, scraping down sides if needed. Beat in pumpkin (don't worry if it curdles a bit). Then stir in flour mixture alternatively with milk just until blended.
  4. Divide among lingers. Bake until a toothpick inserted comes out clean, about 20-25 minutes. Set aside on a rack to cool.
  5. Meanwhile prepare frosting. Beat cream cheese with butter until very creamy. Add brown sugar and beat until creamy. Then add icing sugar and rum, beating until light and fluffy.
  6. Spread the icing among the cooled cupcakes and sprinkle with pumpkin seeds if desired.

Saturday, October 1, 2011

Sweet and Salty Kettle Corn

kettlecorn.jpg

I have a funny story about this kettle corn.

I went to see the movie Drive the other day with a few friends. Great film by the way, I recommend you go see it with a group of people so you don't feel silly when you laugh at the "gory" parts.

So one of the girls who came to watch the movie with us was from Chile. I noticed that she didn't get the regular popcorn from the concession stand but instead got this sweet chocolate popcorn already made in a package. She saw me eyeing up her popcorn and I'm sure felt obliged to give me some, because she did, and then proceeded to tell me about her first movie popcorn experience in Canada.

" When I first came to Canada," imagine this in a fantastic Chilean accent, "I went to the theater and got popcorn with butter in it and when I ate it, I spit it out! The butter was not butter! It was so gross! We have sweet popcorn at the movie theaters in Chili, none of this fake butter!"

I then told her that the majority of food in North America is crap, and she intensely gripped my shoulder and said "Yes! Yes it is! I'm so glad you agree with me!"

I thought that was pretty funny, but at the same time sad. She's not the first person to complain about American food to me, and when I say American I mean North America. When I ask my European friends what they miss most about Europe, they all say the food. And it's not just the food served at the restaurants but the ingredients at the grocery stores as well.

So this funny story led me to make this sweet kettle corn, as a reminder that not all food in North America is bad and that it is possible to eat well here.

Enjoy!

kettlecorn2.jpg

Sweet and Salty Kettle Corn
Makes a big bowl
  • 1/4 cup of vegetable or canola oil
  • 1/2 cup of popcorn kernels
  • 1/3 cup of sugar
  • 1 tsp of salt
  1. In a large pot mix together oil and popcorn kernels on medium heat. Once the oil starts to sizzle, wait a few seconds (20-30 secs) and then mix in the sugar and salt. Cover the pot with a lid.
  2. When the popcorn starts to pop shake the pot while holding onto the lid. Shake every few seconds to make sure the popcorn does not burn and the sugar does not caramelize, it burns pretty easily so just be careful.
  3. When the popping begins to slow down (2-3 pops per second) take it of the heat and continue to shake until you hear no more popping. Transfer the popcorn to a large bowl and break apart any clumps. If you are not going to eat all the popcorn let cool and keep it in an air sealed container.
*Note: Adding the sugar in just before the kernels are about to pop will prevent your sugar from caramelizing and burning.

Spiced Hokkaido Pumpkin Soup

After living in Germany for almost four months now, I can tell you much has changed for my views about the food culture here. Actually, mu...